Stop motion. 
Video for every classroom.

Help your students tell stories in their own creative voice.

Thank you for joining my session on Stop Motion. This page was created specifically for you to refer back to information and videos presented. If you have any questions please feel free to reach out to me, here or on twitter at @Bethany_Nugent. 

An introduction to stop motion

A Stop Motion is a video created by taking many photos (sometimes referred to as frames) with tiny differences. The result is a video that appears to be animated. Stop motions can be made in a variety of ways. Some, like Gumby, are created using clay and other small objects.Others, like the example to the left, are created with paper pieces. Still others are created completely digitally. The possibilities are endless. 

The Storyline

It is most important that students first develop some sort of storyline for their time lapse. While the fun part of stop motion is getting in and starting creating, if students don't have a previously developed storyline they tend to struggle with what to do with their different pieces. 

This is where any classroom content can be tied in. I have seen everything from circulatory system stop motions, to plant growth, to historical reenactments. Have your students jot down some basicideas so they're ready to go.  

OuterSpace_2015

This fun little stop motion was created by a group of 4th and 5th grade students. Each group had to choose a landscape for their stop motion. Some did under the sea, and the desert, while this group chose a space landscape.

Creating stop motion pieces 

No matter what material students use for their stop motion, it is important to get all of the pieces together before beginning to film. Have them gather or create the pieces for the video in a central location so they don't have to run around grabbing materials while "filming" the video. I love having them keep their pieces in a folder (if flat) or a paper bag (if 3D) so that they can keep track of everything. 

Set Up Your Stop Motion work Space

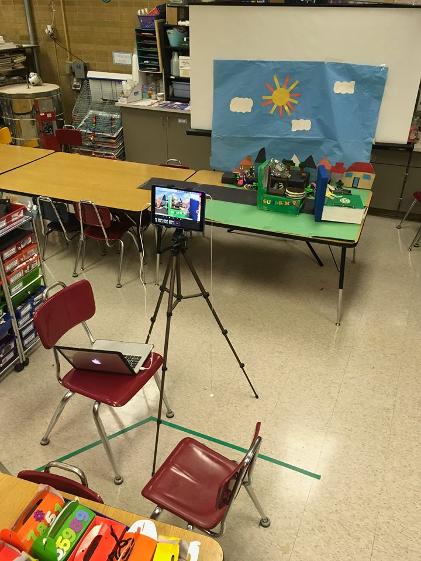
No matter how you set up your space, it is MOST important that the iPad is on some sort of a stable stand. In the picture to the right, a tripod iPad stand was used. This is a great solution if filming from a forward-facing perspective. If using flat pieces, it is best to have your iPad camera at a bird's eye perspective. For this, you can use a wire kitchen rack as seen in the example, or simply use a chair, with the iPad camera just off of the edge of the chair (BOOM - instant iPad stand!).

It is also recommended to use a pair of headphones to capture the image. While this may sound strange at first, it is important to keep your hands off of the iPad as much as possible so that it doesn't get moved or shaken (otherwise it will look like there was an earthquake during your video!). By using headphones, you can take the photos by simply clicking the volume up/down buttons. Try it out a few times before you begin. There are also bluetooth camera shutters that can be used for this, but using them for stop motion can wear down their batteries very quickly due to the number of images required. 

Speaking of number of images, it is very important to set a goal of getting a high number of images. Traditional films run at 24 frames per second (fps). That means that if students want to create a 10 second video, they need 240 pictures! While you can get away with less than 24 fps, it is good to set a high goal for the students. I usually tell them that their goal is at least 500 pictures. This sounds daunting, but when you're just making tiny changes from frame to frame, it actually goes rather quickly. I once had a group create a video with approx. 1800 frames in about 90 minutes. It comes together quickly once you have your components ready to go and your workspace set up. 

The video above gives a short overview of using a wire rack to create a stop motion with paper. A chair can be used if a wire rack is not available, just be sure to have the camera section of the iPad overhang the edge of the chair.

Filming your stop motion

The video to the right goes over the steps of filming a stop motion. After finishing filming, export your video to your camera roll.

This video combines a variety of projects. The Pet Rocks, created by our 2nd/3rd grade students, became our parade watchers. The 4th and 5th grade students each created a parade float showcasing something about Wisconsin as part of their Wisconsin History unit. Finally, the students worked in art to create the background, trees, and "bleachers" for the pet rocks. 
After filming in Stop Motion Studio, this was edited in iMovie.  

Post-Filming: 
Editing your video

If you'd like, you can just share it this way without audio (audio is a paid feature in Stop Motion Studio). Otherwise, spruce your video up a bit by app-smashing! What is app-smashing?  App smashing is using two or more apps to create your final project.

After creating your video in Stop Motion Studio, you can take the video from your camera roll into iMovie, Clips, or another video editing software, to add a voice over or music in the background. You could even create your own background music in GarageBand! 

My favorite app to bring Stop Motion videos into is Clips. Clips has a whole library of copyright-free music, as well as animated posters. Additionally, students can add their voice right on top of their video. Put it all together and you'll end up with an amazing final project. 

Posting your video

If you have permission to do so, I strongly recommend posting your video on Youtube. While there are a variety of places you could share your video, Youtube provides free unlimited storage, which is extra helpful because videos can take up a lot of space on your device. Additionally, you can always download your video back from Youtube at a later date. This video walks you through how to publish to Youtube. 

That's it!

Once you've created your first stop motion videos with students the process will get even easier! It's all about finding your groove, taking risks, and going with the flow. You've got this! :)