


• Apple's apps (including Pages, Keynote, Numbers, iMovie, GarageBand, Clips and more) have amazing features including awesome shapes (that you can make as big as you want to!) and tools like Instant Alpha (to remove backgrounds.)
These apps help you to create powerful, professional files, from spreadsheets, to documents, videos and more.
The apps work seamlessly together and once you learn one, the others are very similar and easy to pick up. The Apple Teacher program provides free professional development to teachers. The Apple teacher program showcases the best features of each app. Click here to learn more!
Don't forget Mail and Calendar! Sync multiple accounts and calendars by using Apple's Mail and Calendar apps. This can really simplify your organization and help you keep everything straight, whether it's for school, extracurriculars, or family.
This also eliminates a couple of tabs in your internet browser, which, if you're anything like the teachers I know....is FULL of different tabs! :)
2. Use siri and dictation
• Never underestimate the power of Siri. She can make your life much more efficient in your classroom. With skills like rolling a dice, flipping coins, picking numbers, and my favorite, setting a timer, Siri can make your time with students efficient and fun. I often use the timer when students need to leave for appointments, or are asked to take a break).
Dictation can be a powerful tool when it comes to typing. Students can speak to their device and instantly they get the typing, rather than the "hunt and peck" method of the past.
3. Easy Attachments
Mac: Click the file (in finder or on your desktop) and drag to the Mail app in your dock. It will automatically attach the file to a new message.
On iPad: Tap the Share Arrow (square with an arrow pointing up) then mail and it will open a new email with the attachment.
4. Easy PDFs
(This will make sharing things with non-Apple users even easier)
- Mac
- Easily save a PDF - whenever you go to the “Print” menu (in ANY app on a Mac)
- In the lower left corner is a “Save as PDF” option.
- iPad
- Press the Share Arrow then export as PDF
5. Try a Video
•Clips is an amazingly powerful app. I've used it with students creating as young as 2nd grade, and I've created videos that I use in teaching constantly.
• They're fast and easy to create, and are a fun way to share on social media to keep parents in-the-loop with what's happening in your classroom.
• A great way for kids to show what they know - and they'll have a blast too!
• Instructional videos below! (NOTE: There are two...the top one is the updated version and the second is the original version; I know that some districts don't update right away and wanted to leave the original resource available.)
I also included an overview of Green Screen by Do Ink.
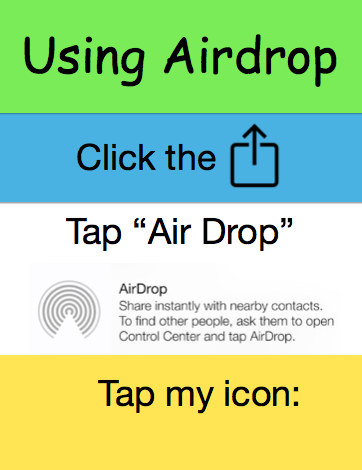
 Airdrop Poster-ToShare.pdf
Size : 168.686 Kb
Type : pdf
 Airdrop Poster-ToShare.pages
Size : 455.98 Kb
Type : pages


|
10 iPad home screens wallpaper.key Size : 4593.446 Kb Type : key |
